
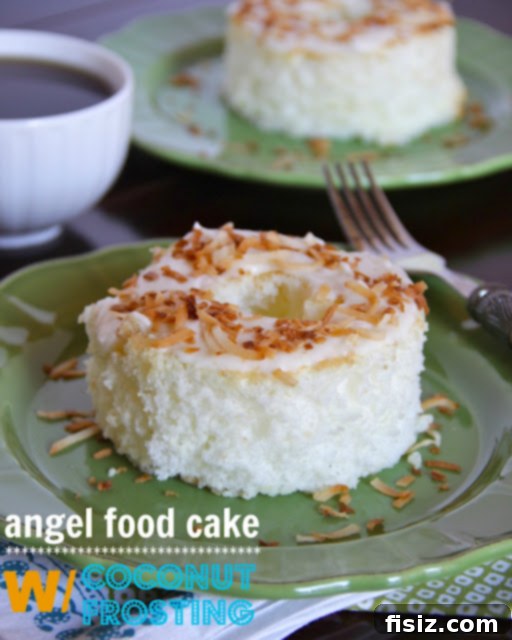
Indulge in Petite Perfection: Mini Angel Food Cakes with Irresistible Toasted Coconut Frosting
There’s an undeniable charm to miniature things, isn’t there? Call it a fascination, an affection, or even a delightful obsession, but I’ve always found immense joy in the world of the small. From the moment I spot them, tiny items have a way of capturing my heart and sparking a peculiar delight. Think about it: how can a pair of tiny pink Chuck Taylor sneakers not make you swoon? They embody pure innocence and cuteness in a way their adult counterparts simply cannot.
My kitchen cabinets are a testament to this penchant for the petite. I adore tiny flatware and an assortment of small plates. They’re absolutely perfect for serving appetizers, which, if I’m being honest, I could happily subsist on for the rest of my life. Imagine savory bacon-wrapped dates, generously stuffed with creamy goat cheese – bite-sized perfection that’s both elegant and utterly delicious. And then there’s the travel section at Target, a dangerous yet irresistible zone where miniature soaps and shampoos beckon. Those adorable little body washes? They’re simply too cute to pass up!
This particular affection for all things small isn’t unique to me; it’s a trait I undoubtedly inherited. My mother, in fact, reigns as the undisputed queen of miniature collections. Her home boasts an impressive array of small drinking glasses, delicate ice cream bowls perfect for a modest scoop, and an entire whimsical army of miniature gnomes adorning her garden. It’s clear to see that the apple truly doesn’t fall far from the tree when it comes to our shared love for the charmingly diminutive.
A Thoughtful Gift and a Three-Year Delay: The Genesis of Mini Angel Food Cakes
The story of these delectable mini angel food cakes began three years ago, with a thoughtful Christmas gift from my sweet mother. Nestled in my stocking were these utterly adorable individual angel food cake silicone molds. My mom, always pragmatic and keenly aware of my baking endeavors, knew the challenges of whipping up a bazillion egg whites at high altitude. Baking a full-sized angel food cake to perfection, ensuring it rises beautifully and maintains its airy texture, is a dilemma in itself, often requiring careful technique and a touch of luck.
Her rationale was simple yet brilliant: by gifting me these miniature molds, she hoped I would be more inclined to bake this lighter-than-air dessert more frequently. Individual portions would simplify the baking process, reduce the pressure of a perfect grand presentation, and make serving a breeze. It was a gesture born of love and a deep understanding of my baking habits and the local altitude’s impact on delicate recipes.
However, I must confess, I haven’t always been the most diligent daughter in the immediate aftermath of receiving such gifts. My intentions were undeniably good. Upon returning to Denver after that Christmas, I fully planned to whip up a batch of these dainty cakes for my husband and myself. But, as life often dictates, days turned into weeks, and weeks into months, and somehow, I simply forgot. I know, I know – shame on me! The worst part? A staggering three years elapsed, and those cute little silicone molds remained unused, tucked away and gathering dust. The horror of such neglect still haunts me!
From Forgotten Treasure to Culinary Inspiration: Rediscovering Baking Joy
Just last week, serendipity struck during a rather less glamorous domestic task. While attempting to fix a stubbornly broken kitchen drawer (a gentle reminder that even kitchen shelves have weight limits – oops!) and subsequently undertaking a much-needed clean-out of said drawer, I stumbled upon those long-lost little treasures. There they were, the individual angel food cake molds, looking as pristine and patient as the day they were gifted. The moment of rediscovery was akin to finding buried treasure, instantly igniting a spark of culinary inspiration and a renewed determination to finally put them to good use.
My initial thought was to prepare a classic, standard plain angel food cake, perhaps with a simple strawberry glaze. It’s a timeless combination, light, and refreshing. But then, a wave of guilt washed over me. These molds had waited patiently for three long years! A simple glaze felt almost like a disservice to their unwavering patience. I knew I needed to “kick the topping up a notch,” to create something truly special, something that would celebrate their long-awaited debut in my kitchen. The creative wheels began to turn, prompting a delightful internal debate.
My mind cycled through various flavor possibilities, each offering its own appeal. Blueberry? No, not quite hitting the mark. Lemon? Maybe, that had potential, offering a bright, zesty contrast. But then, a sudden flash of inspiration: Coconut? Ahhhhh… yes! A resounding, enthusiastic YES!
The Perfect Pairing: Toasted Coconut Elevates a Classic
Now, I must admit, I am generally not the biggest fan of coconut, often finding its texture or overwhelming flavor a bit much. However, in this particular instance, with these individual angel food cakes, coconut didn’t just work – it made these little beauties sing! The foundation of the cake is still the delightfully simple, standard vanilla flavor that comes from a convenient box mix. This offers a wonderfully light and airy base, a perfect canvas for something extraordinary.
The magic truly happens with the toasted coconut on top. The act of toasting brings out a deeper, nuttier, and more aromatic dimension of the coconut, transforming it from a mere garnish into an integral component of the dessert’s flavor profile. When combined with the creamy, subtly sweet frosting, it creates a textural and taste sensation that is simply unparalleled. The delicate crunch of the toasted flakes against the cloud-like cake and smooth frosting is pure heaven. This unexpected pairing elevates the entire dessert to an undeniable 11/10, making it an absolute triumph in my “small fetish” circle of love.
These mini angel food cakes are more than just a dessert; they are a testament to the joy of rediscovery, the delight of individual portions, and the transformative power of a well-chosen topping. They are light enough to feel guilt-free, yet decadent enough to satisfy any sweet craving. Perfect for a personal treat, a small gathering, or a thoughtful gift, they embody everything wonderful about baking with a touch of charm and creativity.
Recipe: Individual Angel Food Cakes with Toasted Coconut Frosting
A Lighter-Than-Air Treat You Can’t Resist
(Adapted from Sandra Lee’s Mini Angel Food Cakes)
Yields: Approximately 8-9 individual mini cakes (recipe scaled for frosting enough for 2 for testing, but easily doubled)
Prep Time: 15 minutes
Cook Time: 15 minutes
Ingredients:
For the Mini Angel Food Cakes:
- 1 box white angel food cake mix (standard 16-ounce size)
- 1 ¼ cups cold water (or as directed on package for high altitude adjustments)
For the Decadent Toasted Coconut Frosting:
- 4 tablespoons unsalted butter, softened to room temperature
- 1 teaspoon pure vanilla extract
- 1 teaspoon coconut extract (for an extra burst of flavor!)
- ¼ teaspoon salt
- 2 cups powdered sugar, sifted (plus more if needed)
- 4 tablespoons heavy whipping cream (unwhipped, chilled is fine)
- ½ cup coconut flakes (shredded or unsweetened), toasted
Step-by-Step Directions:
Preparing the Feather-Light Angel Food Cakes:
- Preheat Oven: Begin by preheating your oven to 350°F (175°C). Ensure your oven rack is in the middle position for even baking.
- Prepare Batter: In a large mixing bowl, combine the angel food cake mix with 1 ¼ cups of cold water. Beat with an electric mixer on low speed for 30 seconds, then increase to medium speed and beat for another minute, or until the mixture is well combined and slightly frothy. Refer to your specific cake mix package for any high-altitude adjustments or additional instructions, though mini cakes are generally more forgiving.
- Fill Molds: Place your individual silicone angel food cake molds (or other suitable mini cake molds) on a baking sheet for easier transfer. Carefully fill each mold approximately ¾ of the way with the airy cake batter. A standard box mix typically yields enough batter for 8 to 9 individual mini angel food cakes. For this particular recipe test, I focused on making two, but feel free to bake as many as your molds allow!
- Bake: Bake the mini cakes for about 15 minutes, or until the tops are golden brown and spring back lightly when touched. A wooden skewer or toothpick inserted into the center should come out clean.
- Cool Properly: This step is crucial for angel food cake! Immediately after removing from the oven, flip each silicone mold upside down. You can balance them on the necks of glass bottles (like soda or water bottles) or a cooling rack with narrow grates to allow air circulation around the entire cake. This inverted cooling prevents the delicate cake from collapsing and helps it maintain its signature airy structure. Allow them to cool completely, undisturbed, for at least 1-2 hours before attempting to remove them from the molds.
- Remove from Molds: Once completely cool, gently press the bottom of the silicone molds to release the cakes. They should slide out easily.
Crafting the Creamy Toasted Coconut Frosting:
- Toast Coconut: While your cakes are baking or cooling, toast your coconut flakes. Spread the ½ cup of coconut flakes evenly in a dry skillet over medium-low heat, or on a baking sheet in the oven alongside your cakes for the last 5-7 minutes. Stir frequently until golden brown and fragrant. Watch carefully, as coconut can burn quickly! Remove from heat and let cool completely.
- Cream Butter and Sugar: In a medium mixing bowl, using an electric mixer, cream the softened unsalted butter with 1 cup of the sifted powdered sugar until light and fluffy.
- Add Flavorings: Stir in the vanilla extract, coconut extract, and salt. The frosting will be quite thick at this stage.
- Achieve Consistency: Add 2 tablespoons of the heavy whipping cream and stir well to combine. The frosting will still be thick. Now, add another 2 tablespoons of cream and stir again. The frosting might appear a bit runny after this. This is where the remaining powdered sugar comes in!
- Thicken and Smooth: Gradually incorporate the other cup of sifted powdered sugar into the frosting, mixing well until it becomes smooth and reaches your desired spreadable consistency. If the frosting seems too thick, add more cream, one teaspoon at a time, until it’s perfect for piping or spreading. If it’s too thin, add a little more powdered sugar.
- Frost the Cakes: Once the cakes are completely cool, pipe or spread about one and a half tablespoons of the luscious toasted coconut frosting onto the top of each individual cake. You can use a small offset spatula, a knife, or even your finger to spread it lightly and evenly.
- Garnish and Serve: Generously sprinkle the toasted coconut flakes over the frosting on each cake. Serve immediately and savor every light, airy, and coconut-infused bite!
Pro Tips for Your Mini Angel Food Cake Baking Adventure
Making these individual angel food cakes is a delightful process, and with a few extra tips, you can ensure your results are always spectacular:
- Silicone Molds are Key: While the recipe specifies silicone molds, which are fantastic for easy release, you can also use mini Bundt pans or even muffin tins. If using metal pans, ensure they are NOT greased. Angel food cake needs to climb the sides of the pan to achieve its characteristic height and airiness. Parchment paper liners in muffin tins could work, but do not grease them.
- Cooling is Non-Negotiable: The inverted cooling method is critical for angel food cake. It allows the delicate structure to set without collapsing under its own weight. Resist the urge to remove them early!
- High-Altitude Adjustments: While mini cakes are more forgiving, if you live at a very high altitude (above 7,000 feet), you might need to slightly increase the water in the cake mix by a tablespoon or two, or follow specific package instructions for high-altitude baking.
- Flavor Variations: Don’t limit yourself to coconut! Once you master this recipe, try other toppings. A fresh berry compote, a lemon glaze, or a simple chocolate drizzle would all be delicious. You could also infuse the cake batter with citrus zest for an extra pop of flavor.
- Make Ahead Tips: The baked angel food cakes can be stored, unfrosted, in an airtight container at room temperature for up to 2-3 days, or frozen for up to a month. Thaw at room temperature. The frosting can be made a day ahead and stored in the refrigerator; bring to room temperature and re-whip briefly before using. Toast the coconut just before serving for optimal crunch and flavor.
- Serving Suggestions: These mini cakes are perfect for parties, individual desserts for family dinners, or a thoughtful treat for a friend. Pair them with a scoop of vanilla bean ice cream or a side of fresh fruit for an elevated experience.
The Enduring Joy of Small Pleasures
Rediscovering those forgotten silicone molds and transforming them into these individual angel food cakes with toasted coconut frosting has been a truly rewarding experience. It’s a reminder that sometimes the greatest joys come in the smallest packages, or in this case, the smallest cakes.
This recipe delivers not just a dessert, but a moment of lighthearted indulgence. The cloud-like texture of the angel food cake, coupled with the rich, aromatic sweetness of the toasted coconut frosting, creates a harmonious balance that is both elegant and comforting. It’s a testament to how a simple box mix can be elevated into something truly special with a little love and a creative topping.
So, whether you share my “fetish” for tiny delights or simply appreciate a perfectly portioned dessert, I wholeheartedly encourage you to try making these individual angel food cakes. They are easy to make, beautiful to present, and guaranteed to bring a smile to anyone who takes a bite. Embrace the charm of the miniature, and treat yourself to this delightful experience!